
Choose Your Connection Type Before Picking a Provider
Japan has four practical options for most short-term visitors: eSIM, physical SIM, international roaming, and Pocket Wi-Fi. Start with the way you want to connect rather than with a list of brand names.
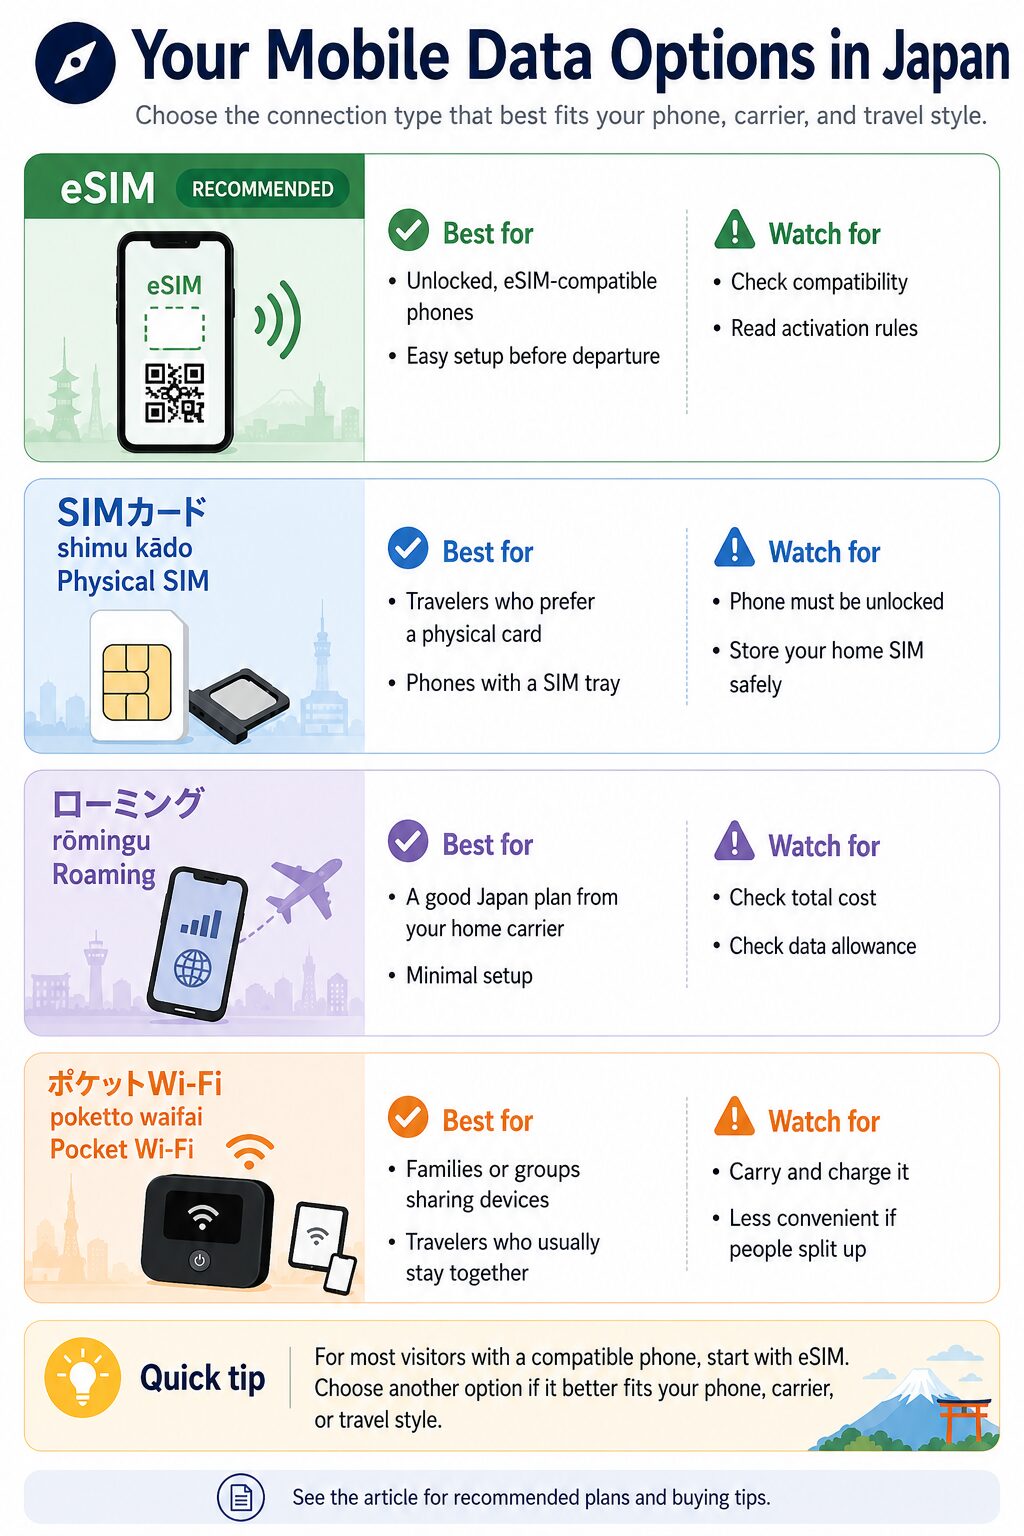
For a typical first-time visitor with an unlocked eSIM-compatible phone, eSIM is the simplest default. There is nothing to collect at the airport or physically swap, and many plans can be prepared before departure.
A physical SIM is still a perfectly practical choice if you already prefer that setup. The broader recommendation is more important than the technology: decide how you will connect before you fly whenever possible.
How Much Data Should You Start With?
You do not need to calculate every megabyte before your trip. For normal travel use, the following amounts are sensible starting points rather than strict minimums.
| Trip length and use | Start with |
|---|---|
| 5–7 days, normal use | About 5GB |
| 8–14 days, normal use | About 10GB |
| 15–30 days, normal use | About 20GB |
| Frequent streaming, large uploads, long video calls, or regular tethering | High-data or unlimited plan |
“Normal use” means maps, train searches, messaging, translation, email, ordinary web browsing, social media, and occasional photo uploads. Accommodation Wi-Fi can cover larger backups, software updates, and much of your streaming.
If you use little video and regularly return to accommodation Wi-Fi, you may need less. If you expect to stream heavily or tether a laptop, skip the small fixed-data plans and look at the heavy-use option below.
Recommended Plans for Different Travelers
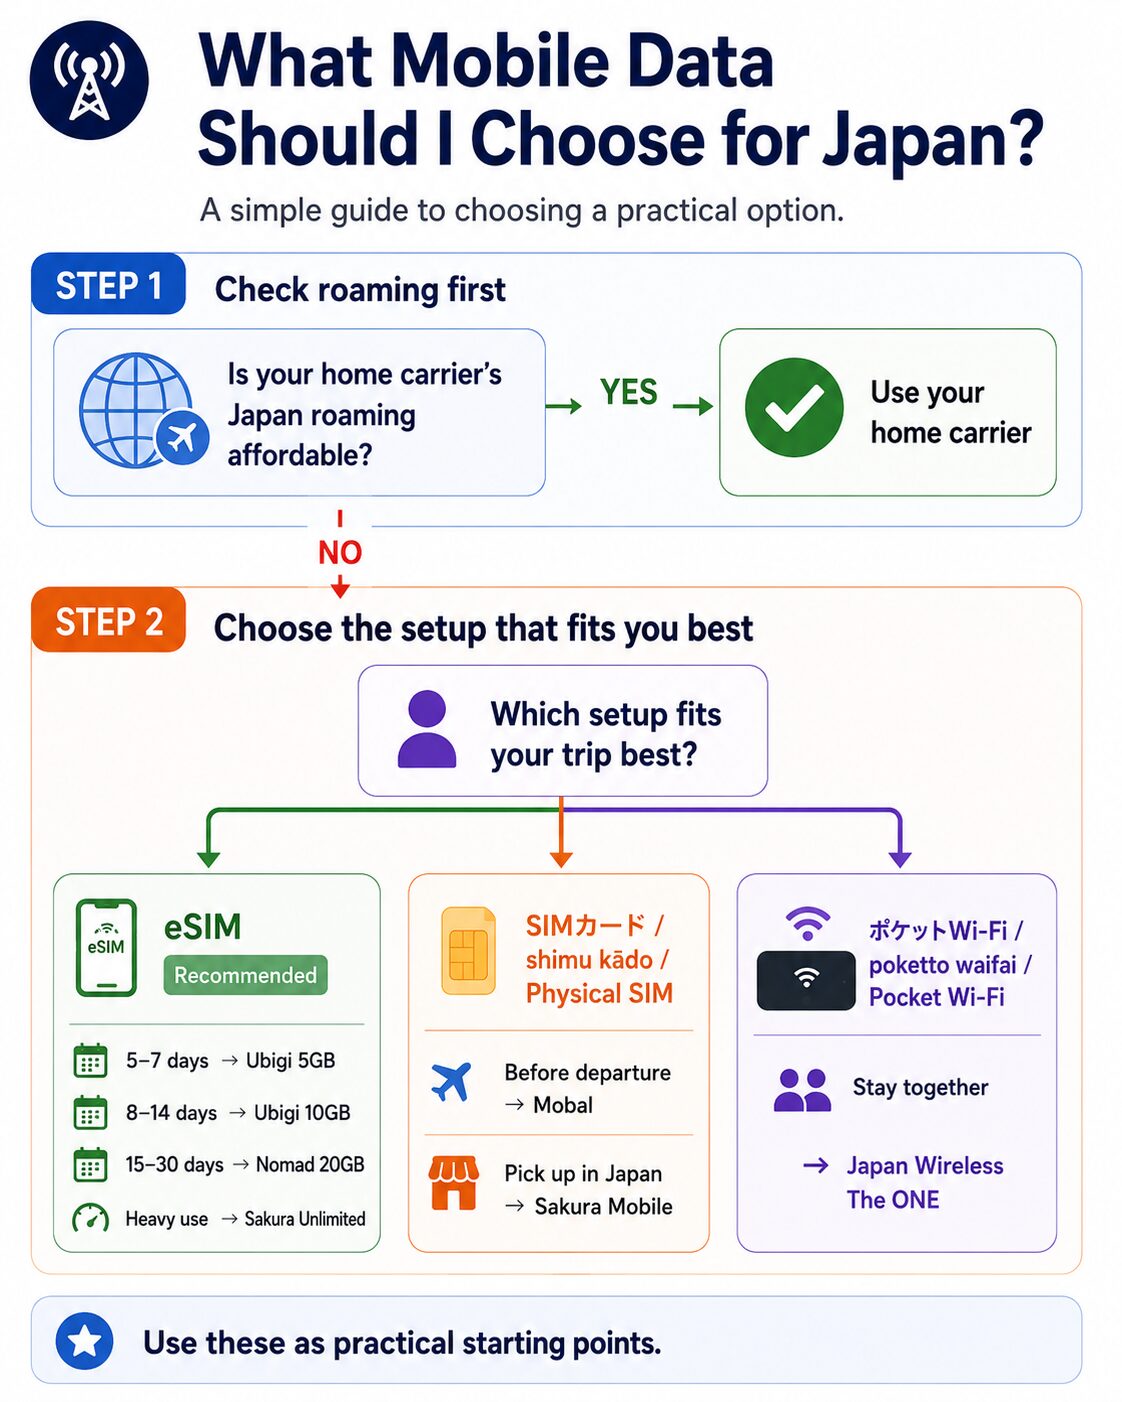
The plans below are not chosen because they are guaranteed to be the cheapest listing on the internet. The aim is to give you a dependable, reasonably priced starting point with straightforward setup and conditions that make sense for a first trip.
Prices checked: August 28, 2026 (JST). Prices are shown primarily in Japanese yen for easy comparison. When a provider lists a plan in another currency, the yen amount is an approximate conversion at the time checked. The final price shown at checkout may vary by provider, sales region, exchange rate, or promotion.
5–7 Days With Normal Use: Ubigi Japan 5GB / 15 Days
For a short sightseeing trip, start with Ubigi’s Japan 5GB / 15-day one-off plan. The checked price was ¥1,700.
The plan can be installed before departure, uses Ubigi’s Smartstart system so the data period begins when you reach the destination, and currently connects through KDDI and NTT Docomo. Data sharing is supported, and additional data can be purchased if you run short.
Five gigabytes is not a promise that every traveler will stay within the allowance. It is a practical starting point for a one-week trip built around maps, train searches, messaging, browsing, and moderate social-media use.
Check the current Ubigi Japan 5GB / 15-day plan before purchasing.
8–14 Days With Normal Use: Ubigi Japan 10GB / 30 Days
For a typical one- to two-week first trip, Ubigi’s Japan 10GB / 30-day plan is the main benchmark. The checked price was ¥2,700.
This is not always the absolute cheapest 10GB plan. At the same check, Nomad listed its Japan 10GB / 30-day plan at US$16, roughly ¥2,500 at the exchange rate used for this comparison. That still puts the two plans in a similar price range, and a small difference like this is not enough on its own to make one established service clearly better than another.
Ubigi remains a sensible default because the price is in the same general range, the setup can be completed before travel, Smartstart reduces the risk of starting the validity period too early, and the current plan can use KDDI and NTT Docomo networks.
Use the current Ubigi Japan 10GB / 30-day plan as a practical price and feature benchmark.
15–30 Days With Normal Use: Nomad Japan 20GB / 30 Days
For a longer trip, the best-value fixed-data option can change. At the time checked, Nomad listed its Japan 20GB / 30-day plan at US$23, roughly ¥3,600 at the exchange rate used for this comparison. For normal use over two to four weeks, that gives considerably more headroom than a 10GB plan without requiring an unlimited package.
Nomad’s Japan eSIM uses KDDI au and, on some plans, SoftBank; the 20GB / 30-day plan checked here listed KDDI au. Hotspot use is supported, the eSIM can be installed before travel, and the plan starts when it connects to the destination network. Additional data can also be purchased for supported plans.
Twenty gigabytes gives a longer-stay visitor more room for daily navigation, social media, browsing, and occasional video without moving immediately to an unlimited plan.
Check the current Nomad Japan eSIM plans before purchasing.
If You Already Use Klook for Japan Bookings: Klook Japan eSIM
Klook is useful for a different reason. If you already manage attraction tickets, airport transportation, private transfers, or other Japan bookings there, adding your eSIM to the same platform can reduce the number of separate services and accounts you need to manage.
For normal use, choose a total-data package close to the same starting points above: around 5GB for a short trip, 10GB for one to two weeks, or around 20GB for a longer stay. Compare the current Klook price with the benchmark plans above rather than assuming that Klook is automatically cheaper.
Klook’s current main Japan eSIM is data-only, supports hotspot use, and offers total-data and daily-data packages. Its “Unlimited” option currently provides up to 10GB of full-speed data per day before speed is reduced to 128kbps.
See the current Klook Japan eSIM options.
For Heavy Data Use: Sakura Mobile Unlimited eSIM
If you expect regular streaming, large uploads, long video calls, or simply do not want to monitor normal phone data closely, choose Sakura Mobile’s Unlimited eSIM for the number of days you will be in Japan.
Its current Unlimited eSIM has no Fair Usage Policy for normal data used directly on the phone. Hotspot use is different: tethering has a separate total allowance based on the length of the plan, so check that limit if you plan to connect a laptop regularly.
Sakura Mobile advises travelers to follow the installation timing for the exact product. Its Unlimited eSIM can be installed outside Japan, but the company generally recommends installing it after arrival or shortly before entering Japan to reduce setup issues.
Check the current Sakura Mobile Unlimited eSIM prices for your exact trip length.
Alternative: Holafly. Holafly also offers an unlimited Japan eSIM priced by trip length. Its current hotspot allowance is 1GB per day, and the company notes that local network Fair Usage Policy management can temporarily reduce speed in some cases. Choose it when its day-based package or support model suits you better, not simply because both products use the word “Unlimited.”
If You Prefer a Physical SIM Before Departure: Mobal Tourist SIM Card
SIMカード / shimu kādo / SIM card is not only a fallback for phones without eSIM. If you already use physical travel SIMs and prefer having the card in hand before your flight, Mobal is a practical choice because it offers worldwide delivery where available.
Mobal’s current physical Tourist SIM Card range is simpler than its eSIM range. At the last verification, the main data-only choices were:
| Trip length | Physical SIM | Last verified price |
|---|---|---|
| Up to 8 days | 25GB / 8 days | ¥5,800 |
| 9–16 days | 50GB / 16 days | ¥6,490 |
| 17–31 days | 50GB / 31 days | ¥7,920 |
These physical SIMs cost more than the fixed-data eSIM recommendations above, so they are not the default for a price-focused traveler. Their advantage is different: you can receive a physical card before the trip, use a familiar SIM-swapping setup, and avoid relying on eSIM compatibility.
Mobal’s current physical tourist data SIMs use the Docomo network and are data-only. Choose the validity period that covers your trip rather than paying for a longer card you do not need.
Your phone must be carrier-unlocked and have a compatible physical SIM slot. Mobal also notes known compatibility issues with some newer Google Pixel models, including Pixel 7 and later, so check its current compatibility information before ordering. If you remove your home SIM, choose a safe place to store it before changing cards.
Check the current Mobal Tourist SIM Card prices and compatibility information.
If You Want to Pick Up a Physical SIM in Japan: Sakura Mobile Travel SIM
If overseas delivery is inconvenient, Sakura Mobile lets you arrange a physical travel SIM in advance and receive it in Japan. This is still preparation before departure: you have already chosen and reserved the service rather than starting the comparison after landing.
Klook can also act as the booking channel for a Sakura Mobile physical SIM with airport pickup. Its current listing includes Haneda Terminal 3, Narita Terminals 1 and 2, and Kansai International Airport. The Klook package has its own data and speed conditions and is not necessarily identical to every SIM sold directly by Sakura Mobile, so check the exact package, pickup counter, and device compatibility before booking.
Check the current Sakura Mobile Travel SIM options, or the current Klook airport-pickup listing if keeping the booking in Klook is more convenient.
For Families or Several Devices: Japan Wireless The ONE Pocket Wi-Fi
ポケットWi-Fi / poketto waifai / Pocket Wi-Fi makes sense when several devices need one connection and the travelers will usually stay together.
Japan Wireless’s current The ONE plan is a strong default for this use. It is advertised with unlimited data, no daily limit or Fair Usage Policy, a free power bank, multilingual support, and connections for up to eight devices.
The trade-off is physical. The router has to be carried and charged, and the connection stays with the person carrying it. A family that frequently splits up for different activities may be better with individual SIMs or eSIMs.
Because Pocket Wi-Fi pricing depends on the rental dates, enter your actual trip dates on the Japan Wireless rate page. For a group, compare the total router price with the cost of buying individual eSIMs for each person.
Alternative: Sakura Mobile Pocket Wi-Fi. Its current service guarantees at least 10GB of high-speed data per day, after which Fair Usage Policy restrictions may apply. This is a different meaning of “Unlimited” from Japan Wireless’s current no-FUP plan.
If You Need a Japanese Phone Number: Mobal Voice+Data
Most short-term visitors do not need a Japanese phone number. Data-only service is enough for maps, train searches, translation, email, messaging apps, and many online reservations.
If you specifically need ordinary cellular calls, SMS, or a Japanese 070, 080, or 090 number, Mobal offers Voice+Data products. The checked price for its current 30-day tourist Voice+Data physical SIM with 7GB was ¥9,900. Voice-capable services require identity verification and have stricter device requirements; for Android, Mobal currently requires compatible VoLTE support and Android 12 or later. Check the current process and compatibility information before ordering.
See the current Mobal Voice+Data options.
If Your Home Carrier Offers Cheap Roaming: Use It
Before purchasing anything, check your normal carrier’s Japan roaming package. If Japan is already included or a travel pass is reasonably priced for your trip, roaming may be simpler than adding another service.
There is no need to buy an eSIM merely because eSIM is popular. If your existing plan gives you enough data at an acceptable cost, keeping your normal setup is a sensible choice.
How to Use These Recommendations as a Price Benchmark
SIM and eSIM prices change frequently, and promotional plans appear all the time. The recommendations above are therefore not a claim that one provider will always be the cheapest on the day you book.
Instead, use the recommended plan as a benchmark. Compare another service only on roughly equivalent conditions: data allowance, validity, Japanese network, hotspot rules, activation timing, device compatibility, and support.
If another established provider is only slightly cheaper, the small saving may not justify giving up a setup process or support arrangement you understand. If it is meaningfully cheaper under comparable conditions, a price-focused traveler can reasonably choose it instead.
This approach keeps the search manageable: you do not need to find the cheapest SIM in the entire market. You only need to know whether the plan in front of you is clearly better value than a reasonable reference point.
eSIM vs Physical SIM: What Actually Changes?
An eSIM and a physical travel SIM can both provide the mobile data you need in Japan. The biggest differences are how you receive the service and how you manage your phone.
| eSIM | Physical SIM | |
|---|---|---|
| What you receive | Digital mobile profile | Physical card |
| Prepare before departure | Usually possible | Possible with some providers |
| Swap a card | No | Usually yes |
| Store your home SIM | Usually unnecessary | May be necessary |
| Typical setup | App, QR code, or phone settings | Insert SIM and sometimes set APN |
| Often suits | Travelers who prefer digital setup | Travelers comfortable with physical travel SIMs |
eSIM is usually more convenient when your phone clearly supports it. Physical SIM may feel simpler if it is the system you already know. One is not automatically more reliable because it is newer or older.
Calls, SMS and Keeping Your Home Number
Many tourist eSIMs and SIMs are data-only. That is normally enough for a short trip, but think about your home number before departure.
You may still need your regular number for bank or card verification codes, airline messages, account logins, or calls from home. Many newer phones support Dual SIM, allowing a home line and a travel line to remain on the same device.
A common setup is to keep the home line available for calls or SMS while selecting the travel eSIM for mobile data. The important warning is cost: leaving your home line active does not make overseas calls, SMS, or roaming free. Check your carrier’s rules and make sure you know which line is handling mobile data.
What to Check Before Buying
Make Sure Your Phone Is Carrier-Unlocked
Your phone normally needs to be SIMフリー / shimu furī / carrier-unlocked to use another provider’s SIM or eSIM. Check this before purchasing a plan, while you still have easy access to your home carrier’s support.
Check Your Exact Model
eSIM support and physical SIM trays can differ by model and by the country where the phone was sold. Do not assume that every phone with the same product name has the same SIM configuration.
Check When the Plan Starts
There is no universal activation rule. A plan may start when you install it, activate it, insert the SIM, or first connect to a supported Japanese network. Follow the instructions for the exact product you purchased.
Check Data-Only, Hotspot and “Unlimited” Terms Separately
A plan can be unlimited for normal phone use while still limiting hotspot data. Another plan may provide a fixed amount of high-speed data before reducing speed. If tethering or heavy data use matters to you, read those conditions rather than comparing only the word “Unlimited.”
Check Coverage If Your Trip Goes Beyond Major Cities
Most visitors traveling through major urban areas do not need to compare mobile networks in detail. Coverage becomes more relevant for remote mountain areas, islands, rural accommodation, or places far from major population centers. Check the provider’s current coverage information if a specific remote destination matters to your itinerary.
Before You Fly
Once you have chosen a connection, finish as much preparation as the provider allows before departure.
- Confirm that your phone is unlocked.
- Confirm eSIM or physical-SIM compatibility for your exact model.
- Buy or reserve the service.
- Read the activation instructions and check when validity begins.
- Save setup instructions, QR codes, and account details offline where appropriate.
- If using Dual SIM, decide which line will handle mobile data.
- Save your first accommodation’s name, address, and booking details offline.
- Keep essential tickets and reservations available even if mobile data is temporarily unavailable.
The goal is not to make every app work perfectly before your flight. It is to make sure you can get from the airport to your first stay even if the mobile connection takes longer than expected.
For the rest of your pre-departure planning, use our How to Prepare for a Trip to Japan: What to Plan Before You Go guide.
What If Your SIM or eSIM Does Not Connect After Arrival?
A connection problem after landing does not automatically mean the SIM or eSIM is defective. Start somewhere with Wi-Fi so you can reopen the provider’s instructions, then check the basics.
- Confirm that the travel SIM or eSIM is turned on.
- Confirm that it is selected for mobile data.
- Check whether Data Roaming must be enabled for the travel line.
- Turn Airplane Mode on and off.
- Restart the phone.
- Check any APN settings required by the provider.
- Compare the phone settings with the provider’s current setup guide.
- Contact the provider’s support if the connection still does not work.
Do not delete an eSIM profile as an early troubleshooting step unless the provider specifically tells you to do so. Some eSIM profiles cannot simply be reinstalled from the same QR code after deletion.
Mobile Data Makes Independent Travel Easier
Mobile data matters most in the ordinary gaps between major attractions. It helps when you leave a large station and need the right exit, walk the final streets to a small hotel or apartment, check whether a neighborhood café is open, translate a notice, or look up a local bus.
It also gives you room to change plans. You do not need every café, train, street, and meal decided before breakfast if you can check what is around you as the day unfolds.
If Japan’s station system is still unfamiliar, our How to Use Trains and Subways in Japan guide explains platforms, transfers, exits, navigation apps, and what to do when a station feels confusing.
Last verified: August 28, 2026 (JST). Mobile plans, networks, data limits, pickup locations, prices, and activation conditions can change. Check the current terms of the service you plan to use before purchasing.
Frequently Asked Questions
- Is an eSIM better than a physical SIM for Japan?
-
For most travelers with an unlocked compatible phone, an eSIM is more convenient because there is no card to collect or swap. A physical SIM can be just as practical if you already prefer travel SIM cards or want a card prepared before departure.
- How much mobile data do I need for a trip to Japan?
-
For normal travel use, around 5GB is a reasonable starting point for 5–7 days, around 10GB for 8–14 days, and around 20GB for a longer trip of up to a month. Heavy video use, large uploads, or regular tethering can increase that substantially.
- Should I buy the cheapest eSIM I can find?
-
Not necessarily. Compare the price with an established plan offering similar data, validity, network access, hotspot conditions, activation rules, and support. A small saving alone is rarely a good reason to choose a service with less clear conditions.
- Should I buy my SIM or eSIM before going to Japan?
-
Usually, yes. Arranging your connection before departure reduces the number of things you need to solve after landing. A physical SIM can be shipped before your trip or reserved for pickup in Japan, depending on the provider.
- Can I keep my normal phone number while using a Japan eSIM?
-
Many Dual SIM phones allow a home line and travel eSIM to remain active at the same time. This can be useful for calls, messages, or verification codes, but charges from your home carrier may still apply while abroad.
- Is Pocket Wi-Fi better for families?
-
It can be a good choice when everyone usually stays together and several devices share one connection. If family members frequently separate during the day, individual SIMs or eSIMs are usually more flexible.
Related Guides